组件的生命周期
组件从先创建,然后挂载到页面中运行,最后组件不用时卸载的过程,这个过程就叫做组件的生命周期。而在这个过程中,React提供了在适当的时候会自动执行的不同的函数,我们称之为生命周期函数,也称钩子函数。组件的生命周期分为三个阶段:挂载阶段、更新阶段、卸载阶段。
那在这三个阶段要执行哪些钩子函数呢?如今,还有很多企业还在使用React16.x的版本,所以这里还要提下React16.x版本的生命周期,现在我用的版本是React18.x的,那这两个版本生命周期有哪些不一样呢?。下面就来一一介绍这三个阶段:
挂载阶段
React16.x版本的生命周期执行顺序
class Child extends React.Component{
  constructor(){
    super()
    console.log('constructor------1')
  }
  componentWillMount(){
    console.log('componentWillMount------2')
  }
  componentDidMount(){
    console.log('componentDidMount------3')
  }
  render(){
    console.log('render------4')
    let { title  } = this.props
    return <div className="child">
      <h2>{title}</h2>
    </div>
  }
}
浏览器显示效果:
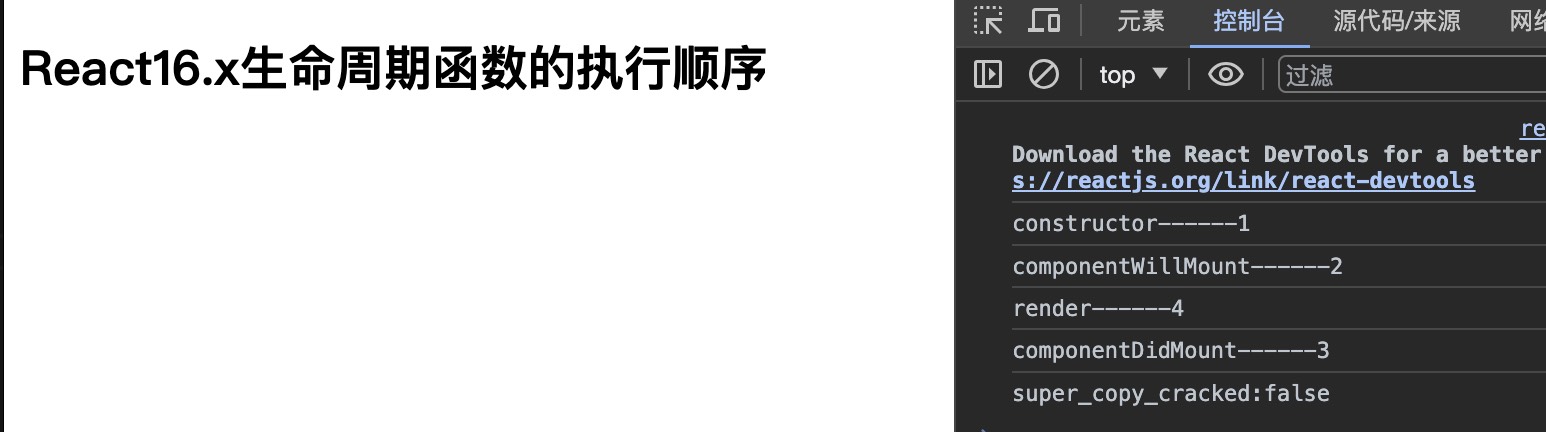
以上是挂载阶段钩子函数的执行顺序,那每个钩子函数是在什么时候被触发,有什么作用呢?
钩子函数:
constructor:是ES6中class的构造方法,组件被创建时会首先调用组件的构造方法初始化state,以及为事件处理程序绑定thiscomponentWillMount:是在组件被挂载在DOM之前调用render:是class组件中唯一必须实现的方法,用于渲染dom,render()方法必须返回reactDOMcomponentDidMount:是在组件被挂载在DOM之后调用,而且只会被调用一次。这个时候虚拟DOM已经挂载到了页面上成为了真实DOM,因此依赖DOM节点的操作就可以放在这个方法里面去实现了,并且可以在此钩子函数里直接调用setState()函数,还可以向服务器端发送网络请求,以及处理依赖DOM节点的操作。
注意:
在
render()里面不能调用setState(),会触发死循环导致内存崩溃
React18.x版本的生命周期执行顺序
class Child extends React.Component{
  constructor(){
    super()
    console.log('触发---constructor')
  }
  static  getDerivedStateFromProps(){
    console.log('触发---getDerivedStateFromProps')
    return null
  }
  componentDidMount(){
    console.log('触发---componentDidMount')
  }
  render(){
    console.log('触发---render')
    let { title  } = this.props
    return <div className="child">
      <h2>{title}</h2>
    </div>
  }
}
浏览器显示效果:
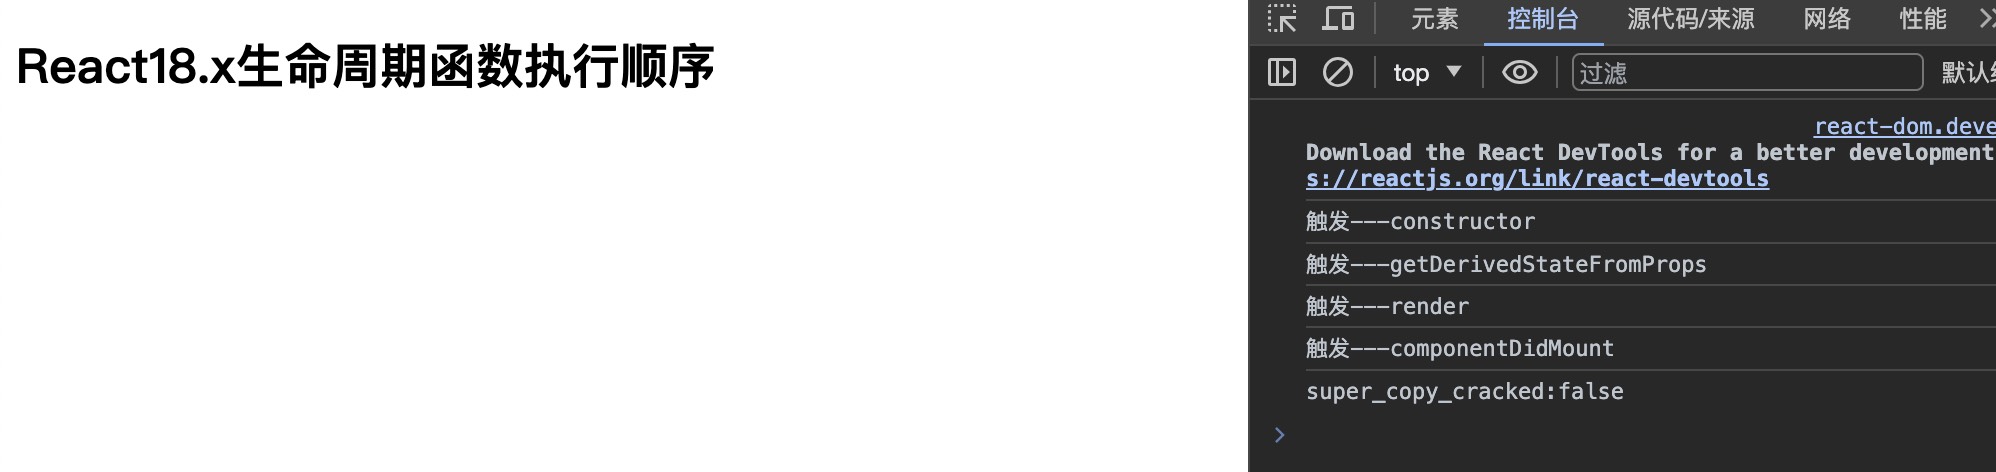
这里主要说下static getDerivedStateFromProps这个钩子函数,其他都和16.x版本的基本一样。
static getDerivedStateFromProps(nextProps, prevState)
1、在初始挂载和后续更新时都会被调用,它的第一个参数为即将更新的props值, 第二个参数是更新前的state,最后返回一个对象更新state,如果返回null就不更新;如果props传入的内容不需要影响到你的state,那么就需要返回一个null,比如下面这个代码:
父组件改变传递给子组件的props
class Parent extends React.Component{
  state = {
    count : 0
  }
  changeCount = () => {
    let {count}  = this.state
    this.setState({
      count: ++count
    })
  }
  render(){
    let {count}  = this.state
    return <div>
      <Child title='React18.x生命周期函数执行顺序' count={ count }>
        <button onClick={this.changeCount}>父组件改变:count</button>
      </Child>
    </div>
  }
}
子组件拿到改变后的props更新组件的state
class Child extends React.Component{
  constructor(){
    super()
    this.state = {
      count:0
    }
    console.log('触发---constructor')
  }
  static  getDerivedStateFromProps(nextProps, prevState){
    console.log('触发---getDerivedStateFromProps',nextProps, prevState)
    const { count } = nextProps;
    // 当传入的count发生变化的时候,更新state
    if (count !== prevState.count) {
        return {
            count,
        };
    }
    // 否则,对于state不进行任何操作
    return null;
  }
  componentDidMount(){
    console.log('触发---componentDidMount')
  }
  render(){
    console.log('触发---render')
    let { title , children } = this.props
    let { count  } = this.state
    return <div className="child">
      <h2>{title}</h2>
      {children}
      <div>{ count }</div>
    </div>
  }
}
2、getDerivedStateFromProps是一个静态函数,静态方法不依赖组件实例而存在。所以不能使用this, 也就是只能作一些无副作用的操作
3、这个方法的出现替代了componentWillReceiveProps方法,这两个方法的作用基本是一样的,都是在props有变化后,更新组件的一些state,不过这个钩子函数要慎用,如果没有正确使用会导致派生state的数据来源不唯一,会使页面渲染更新不正确,比如:传入props会更新组件的state,组件自己也要更新state,这样就会导致不知道该更新谁,是以props为准呢,还是以自己的更新为准呢。去这里查看更多关于getDerivedStateFromProps和componentWillReceiveProps的信息。
下面是错误写法:
class Child extends React.Component{
  constructor(){
    super()
    this.state = {
      count:0
    }
    console.log('触发---constructor')
  }
  static  getDerivedStateFromProps(nextProps, prevState){
    console.log('触发---getDerivedStateFromProps',nextProps, prevState)
    const { count } = nextProps;
    // 当传入的count发生变化的时候,更新state
    if (count !== prevState.count) {
        return {
            count,
        };
    }
    // 否则,对于state不进行任何操作
    return null;
  }
  componentDidMount(){
    console.log('触发---componentDidMount')
  }
  changeCount = () => {
    let { count } = this.state;
    this.setState({
      count: ++count,
    });
  }
  render(){
    console.log('触发---render')
    let { title,children  } = this.props
    let { count  } = this.state
    return <div className="child">
       <h2>{title}</h2>
      {children}
      <div>{ count }</div>
      <div>
        <button onClick={this.changeCount}>子组件改变自己的状态: count</button>
      </div>
    </div>
  }
}
以上就是子组件不仅通过props来给state赋值,还通过this.setState来改变自己的状态state。由于static getDerivedStateFromProps函数不管是挂载、父组件更新、父组件改变props、子组件自己更新状态都会触发这个函数,所以当子组件使用this.setState改变state状态无效,还是拿的props的数据渲染。
更新阶段
组件被挂载到DOM之后,props和state都可以引起组件的更新。
props引起的组件更新,本质上是由渲染该组件的父组件引起的,无论props是否改变,当父组件的render()方法每一次被调用时,都会导致组件的更新。state引起的组件更新,则是通过调用this.setState()修改组件的state来触发的。
因此,父组件调用render方法或者调用this.setState都会引起组件的更新。
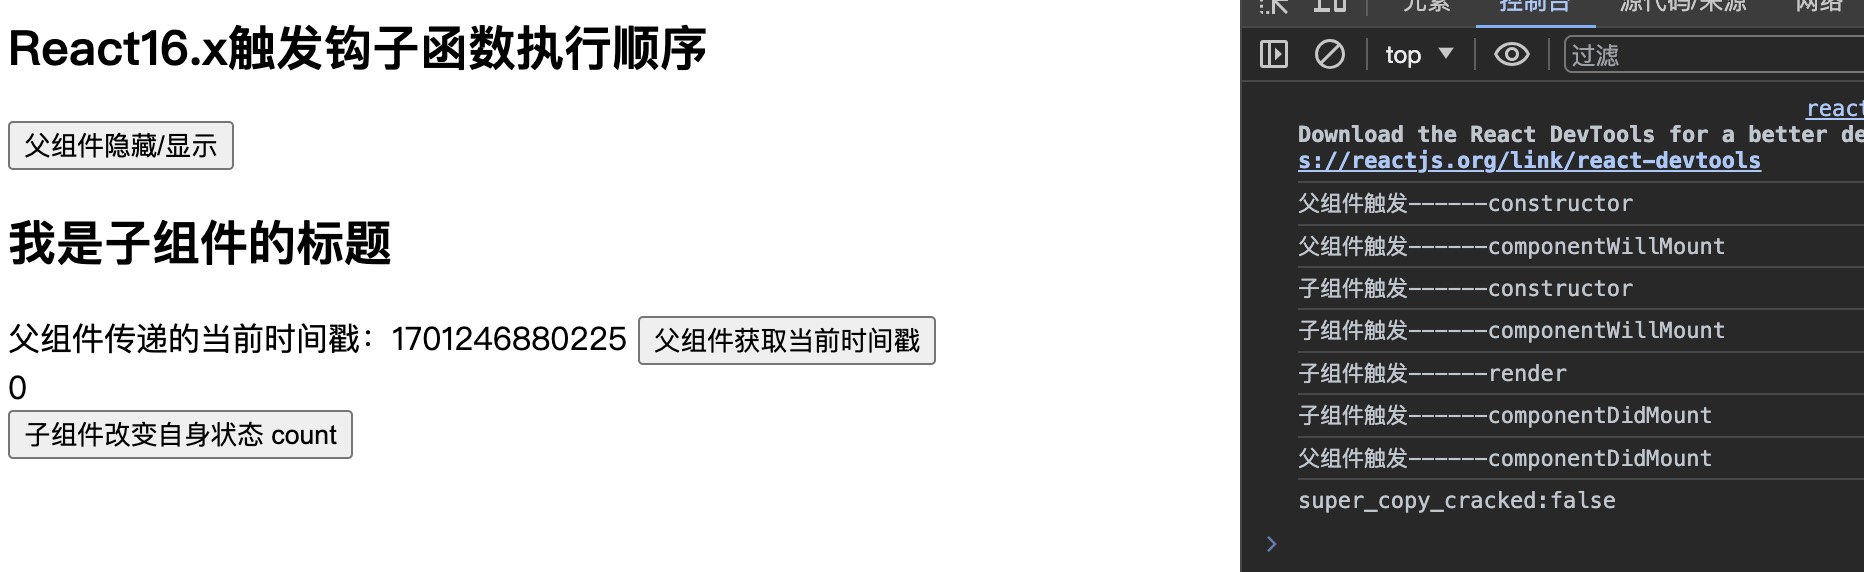
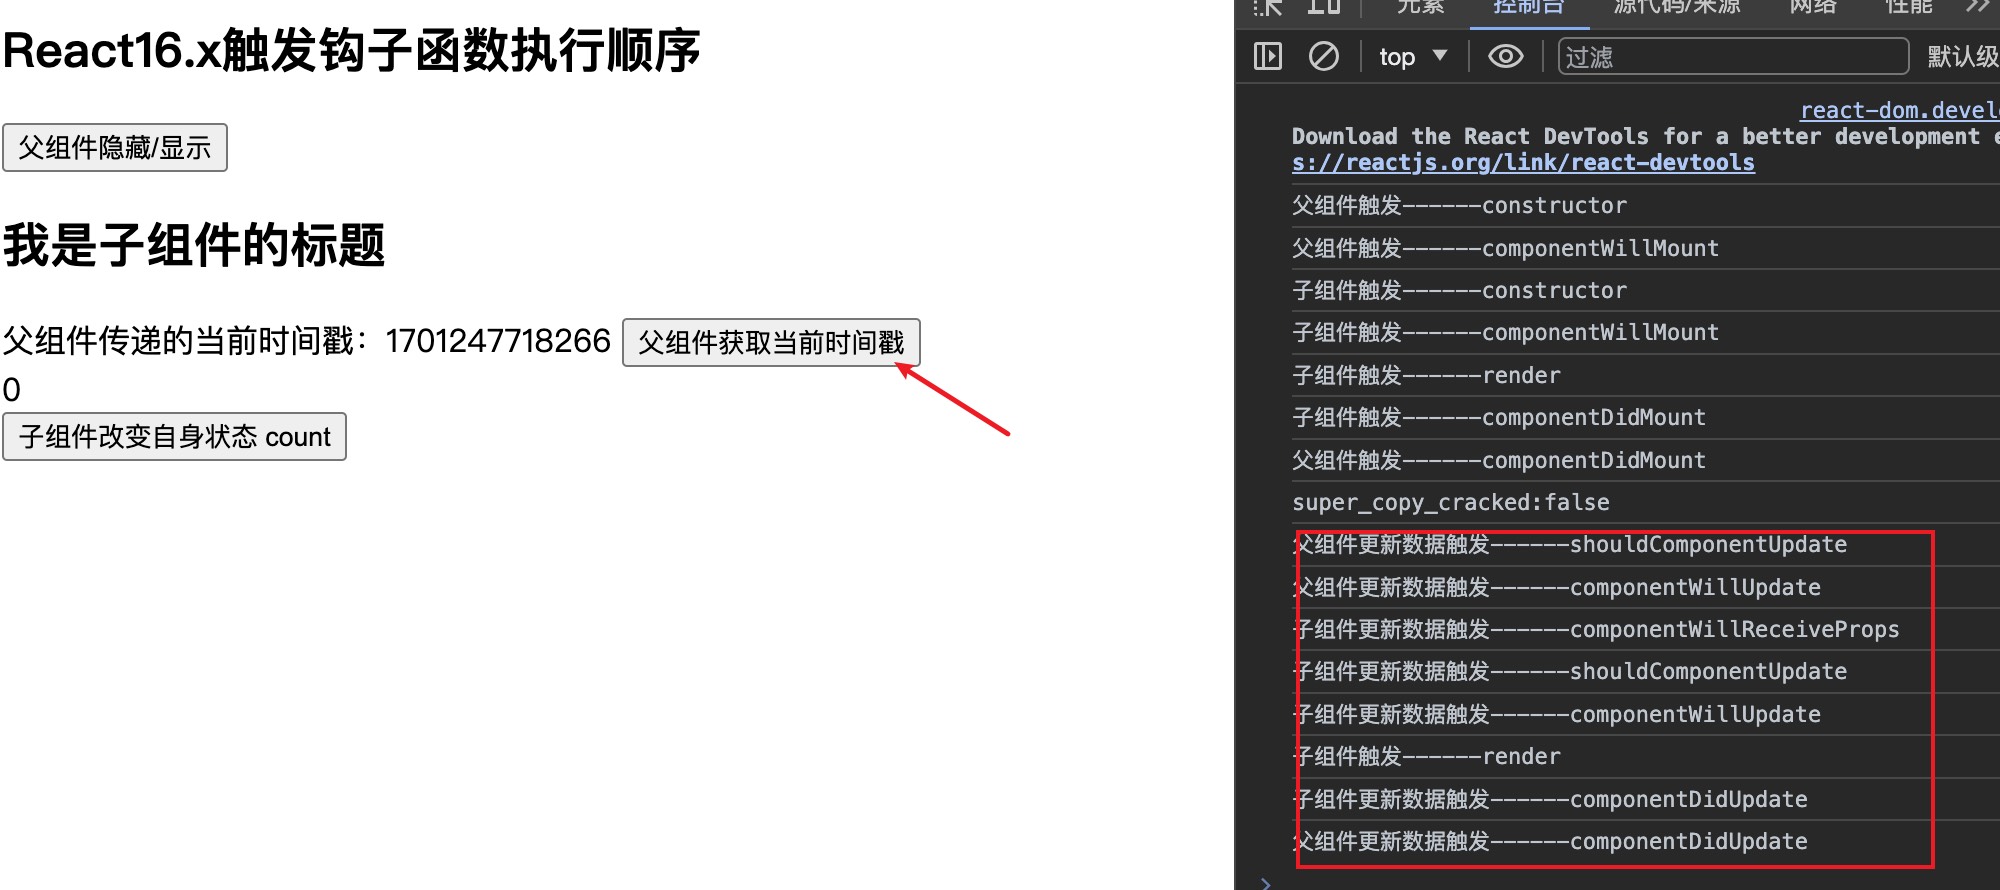
React16.x版本的生命周期执行顺序
父组件点击按钮获取当前时间戳,改变传递给子组件的props
class Parent extends React.Component{
  state = {
    time : new Date().getTime()
  }
  getTime = () => {
    this.setState({
      time:new Date().getTime()
    })
  }
  render(){
    return <div>
      <Child title='React16.x更新数据钩子函数的执行顺序' time={this.state.time}>
        <button onClick={this.getTime}>父组件获取当前时间戳</button>
      </Child>
    </div>
  }
}
子组件改变自己的state状态和父组件传递的props改变后触发的钩子函数
class Child extends React.Component{
  constructor(){
    super()
    this.state = {
      count:0
    }
    console.log('触发------constructor')
  }
  componentWillMount(){
    console.log('触发------componentWillMount')
  }
  componentDidMount(){
    console.log('触发------componentDidMount')
  }
  componentWillReceiveProps(nextProps){
    console.log('更新数据触发------componentWillReceiveProps')
  }
  shouldComponentUpdate(){
    console.log('更新数据触发------shouldComponentUpdate')
    return true
  }
  componentWillUpdate(){
    console.log('更新数据触发------componentWillUpdate')
  }
  componentDidUpdate(){
    console.log('更新数据触发------componentDidUpdate')
  }

  changeCount = () => {
    let { count } = this.state;
    this.setState({
      count: ++count,
    });
  }
  render(){
    console.log('触发------render')
    let { title, time, children  } = this.props
    let { count } = this.state
    return <div className="child">
      <h2>{title}</h2>
      <div>父组件传递的当前时间戳:{time} {children}</div>
      <div>子组件自身状态:{count}</div>
      <button onClick={this.changeCount}>子组件改变自身状态 count</button>
    </div>
  }
}
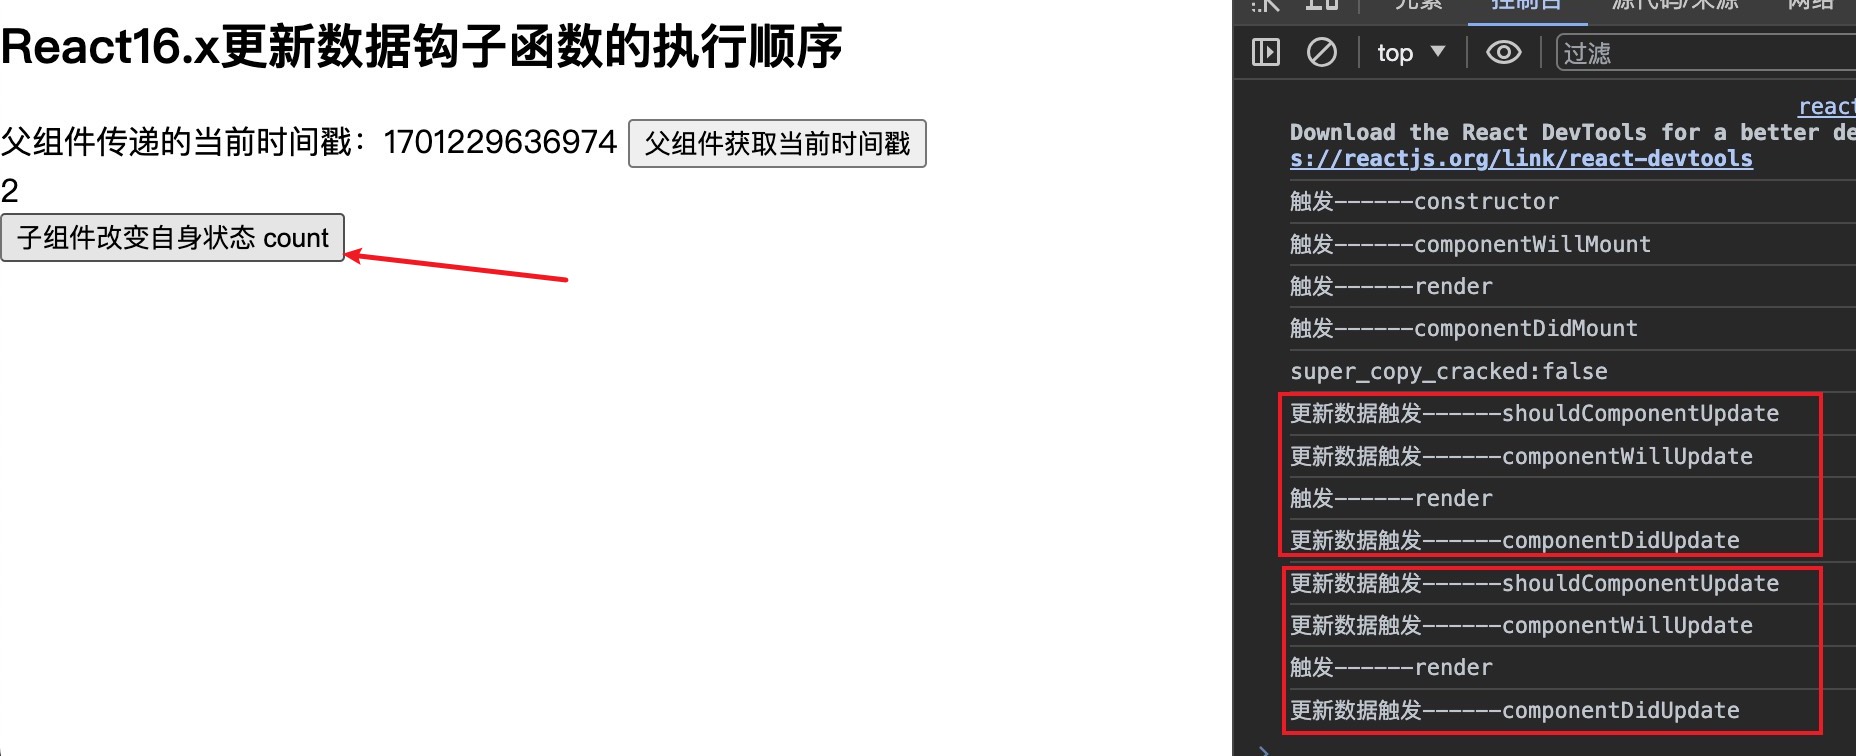
情况一:当点击按钮改变自身state的状态时:
情况二:当点击按钮改变父组件传递的props的状态时:
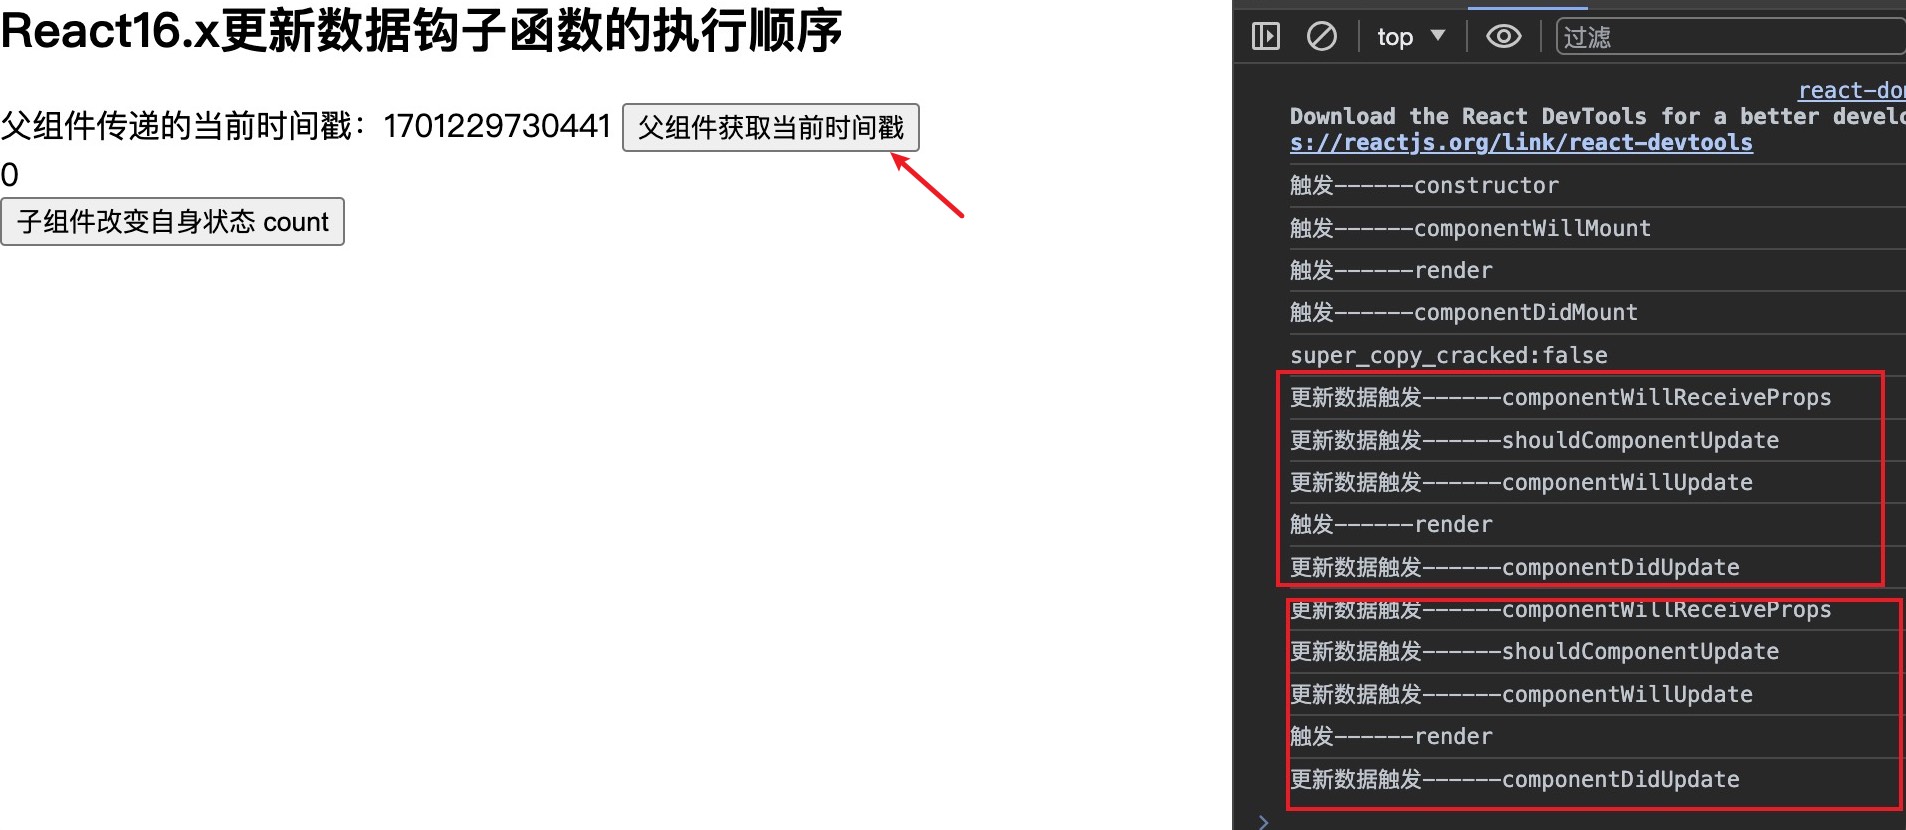
通过上面两种情况可以知道,在更新阶段每个钩子函数的执行顺序,那它们是在什么时候被触发的呢?有什么作用呢?
钩子函数:
componentWillReceiveProps:会在父组件重新渲染和由props引起的组件更新过程中被调用,由state引起的组件更新并不会触发该方法的执行。如果你需要在props发生改变后,相应改变组件的一些state,就可以使用这个生命周期函数,传入该生命周期有两个参数,分别是newProps和nextContext。shouldComponentUpdate:用于决定组件是否继续执行更新过程,默认值为true,如果为false,那就不会继续执行更新过程,也就不会执行shouldComponentUpdate后面的钩子函数了。函数包含两个参数,第一个是即将更新的props值,第二个是即将更新后的state值,可以根据更新前后的props或state来比较加一些限制条件,决定是否更新,用来减少组件不必要的渲染,从而优化组件的性能componentWillUpdate:将要更新数据时触发的函数render:数据状态改变后,重新把虚拟DOM渲染为真实DOMcomponentDidUpdate:在组件更新之后被调用,可以作为操作更新后的DOM。该方法的两个参数prevProps、prevState代表组件更新前的props和state
React18.x版本的生命周期执行顺序
父组件通过改变状态state来改变props
class Parent extends React.Component{
  state = {
    count : 0
  }
  changeCount = () => {
    let {count}  = this.state
    this.setState({
      count: ++count
    })
  }
  render(){
    let {count}  = this.state
    return <div>
      <Child title='React18.x生命周期函数执行顺序' count={ count }>
        <button onClick={this.changeCount}>父组件改变:count</button>
      </Child>
    </div>
  }
}
子组件拿到改变后的props更新组件或组件自己改变状态state来更新组件触发生命周期函数
class Child extends React.Component{
  constructor(){
    super()
    this.state = {
      count:0,
      num:0
    }
    console.log('触发---constructor')
  }
  static  getDerivedStateFromProps(nextProps, prevState){
    console.log('触发---getDerivedStateFromProps',nextProps, prevState)
    const { count } = nextProps;
    // 当传入的type发生变化的时候,更新state
    if (count !== prevState.type) {
        return {
            count,
        };
    }
    // 否则,对于state不进行任何操作
    return null;
  }
  shouldComponentUpdate(nextProps, nextState){
    console.log('更新触发---shouldComponentUpdate')
    return true
  }
  componentDidMount(){
    console.log('触发---componentDidMount')
  }
  getSnapshotBeforeUpdate(prevProps, prevState){
    console.log('更新触发---getSnapshotBeforeUpdate')
    return null
  }
  componentDidUpdate(prevProps, prevState, snapshot){
    console.log('更新触发---componentDidUpdate')
  }
  changeNum = () => {
    let {num}  = this.state
    this.setState({
      num: ++num
    })
  }
  render(){
    console.log('触发---render')
    let { title, children  } = this.props
    let { count, num  } = this.state
    return <div className="child">
      <h2>{title}</h2>
      {children}
      <div>count:{ count }</div>
      <div>num:{ num }</div>
      <div>
        <button onClick={this.changeNum}>子组件改变自己的状态: num</button>
      </div>
    </div>
  }
}
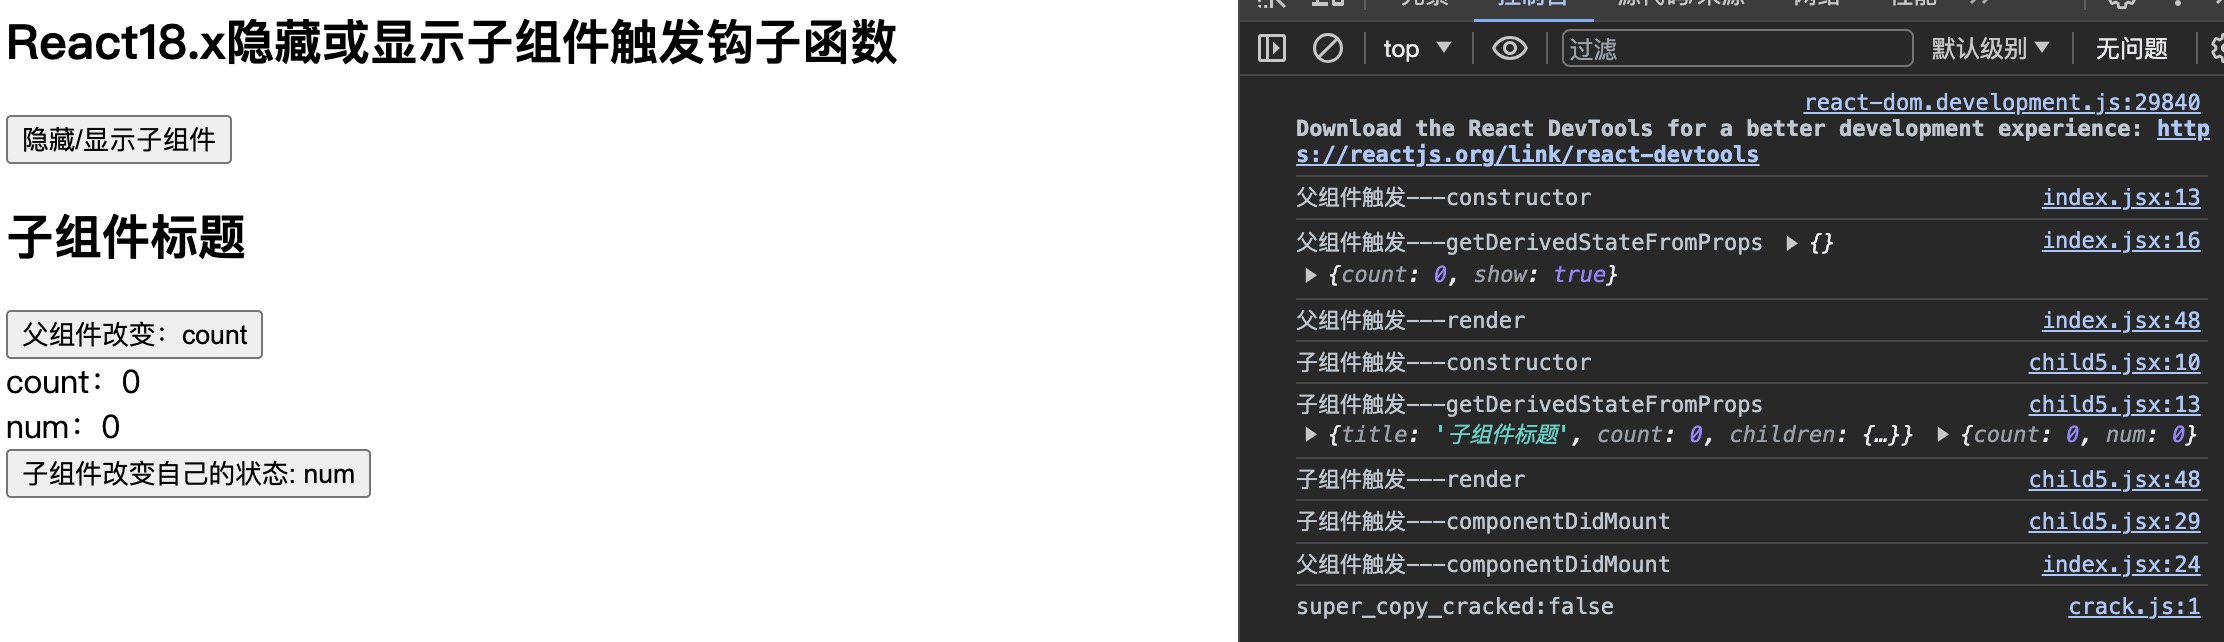
浏览器效果:
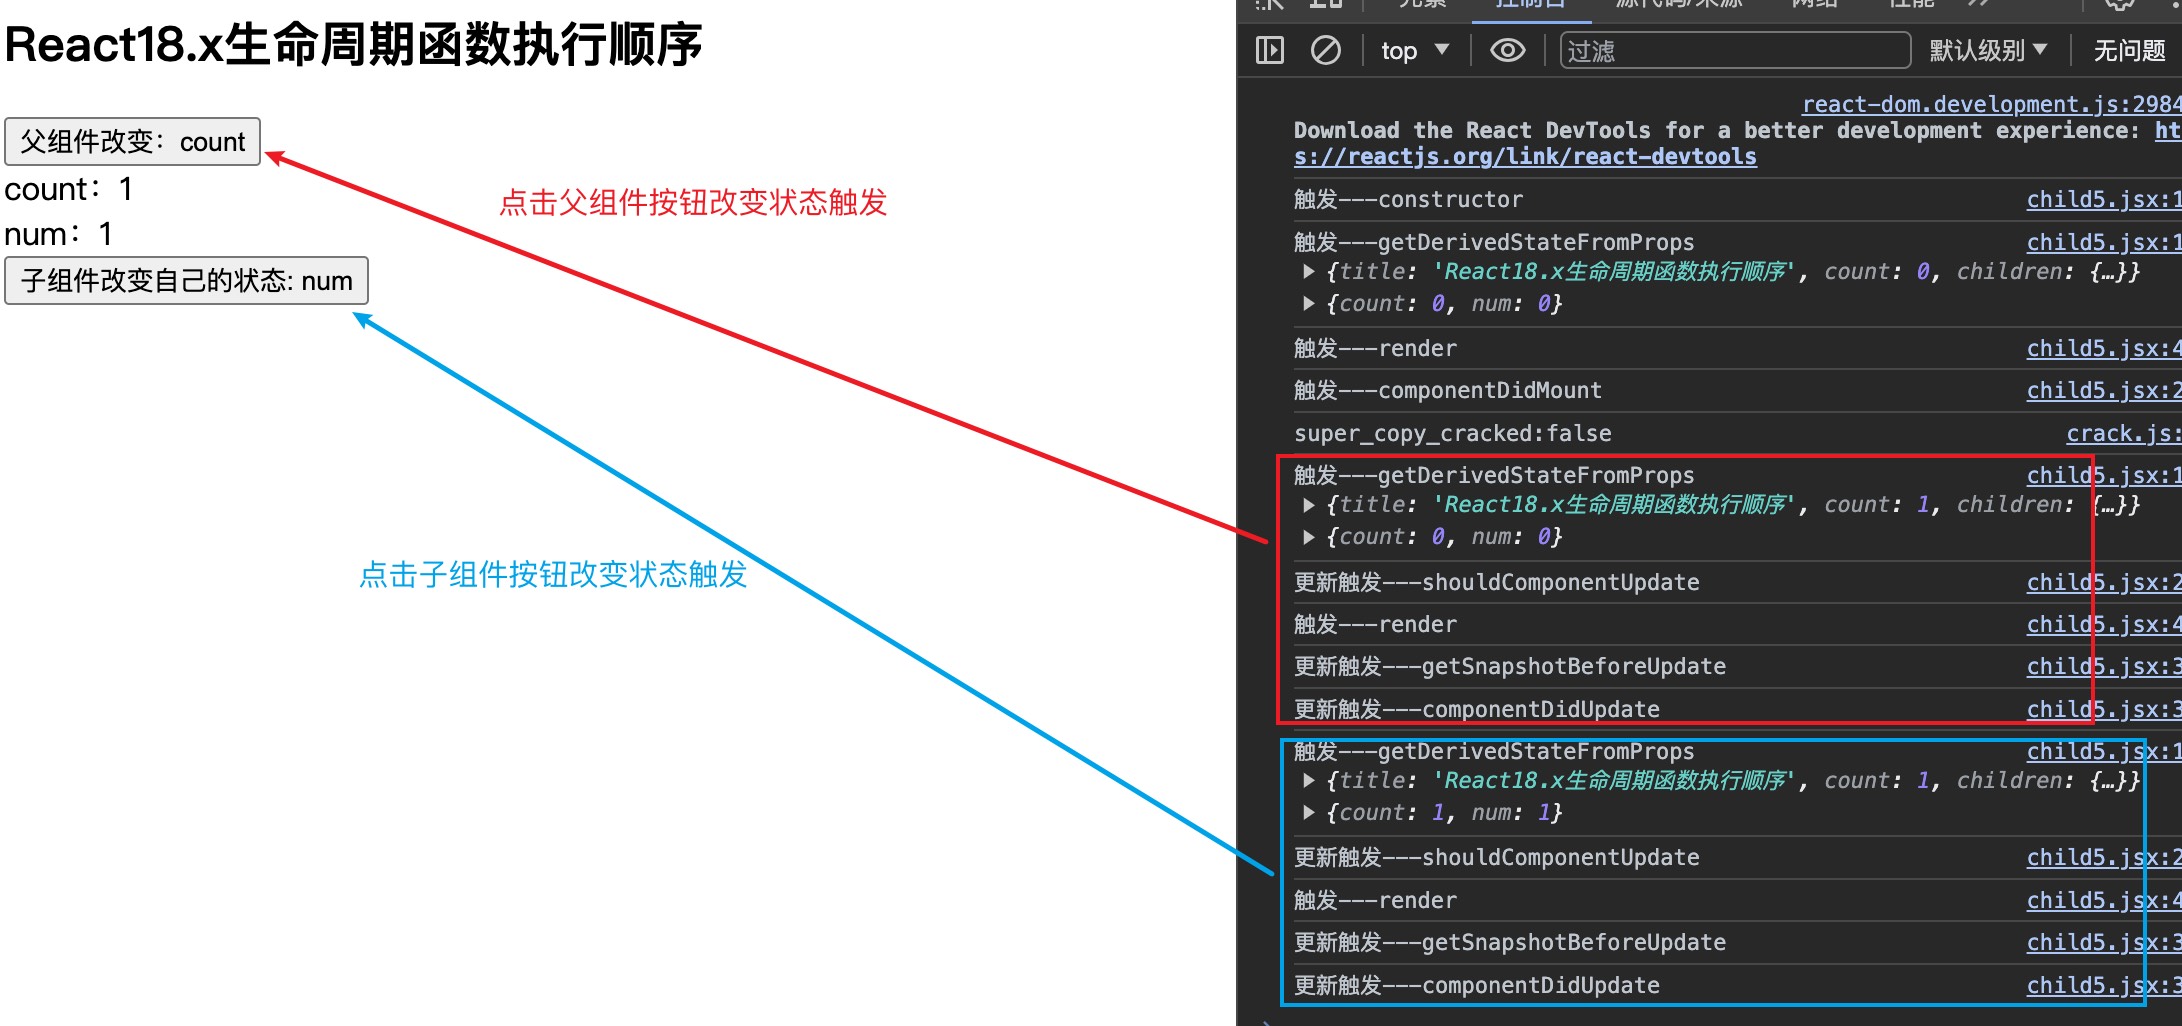
通过上图可以看出,通过父组件改变props和通过组件自己改变状态state触发的生命周期函数都是一样的且顺序也是一样的。
这里说下getSnapshotBeforeUpdate(prevProps, prevState)和componentDidUpdate(prevProps, prevState, snapshot),其他的都和16.x版本的用法一样。
getSnapshotBeforeUpdate():在这个阶段可以拿到上一个状态Dom元素的坐标、大小等相关信息。用于替代旧的生命周期中的componentWillUpdate。此生命周期在render方法之后,componentDidUpdate之前调用,有两个参数prevProps、prevState,表示之前的属性和之前的state,这个函数有一个返回值,会作为第三个参数传给componentDidUpdate,如果你不想要返回值,可以返回null,此生命周期必须与componentDidUpdate搭配使用componentDidUpdate():该方法在getSnapshotBeforeUpdate方法之后被调用,有三个参数prevProps,prevState,snapshot,表示之前的props,之前的state,和snapshot。第三个参数是getSnapshotBeforeUpdate返回的,如果触发某些回调函数时需要用到DOM元素的状态,则将对比或计算过程迁移至getSnapshotBeforeUpdate,然后再componentDidUpdate中统一触发回调或更新状态
卸载阶段
在组件卸载阶段,不管是React16.x版本,还是React18.x版本,都只有一个钩子函数,就是componentWillUnmount()。当组件被卸载或者销毁了就会调用,可以在这个函数里去清除一些定时器,移除事件监听,取消网络请求,清理无效的DOM元素等垃圾清理工作等。
父组件控制状态this.state.show来隐藏/显示子组件
class Parent extends React.Component{
  state = {
    show : true
  }
  changeShow = () => {
    this.setState({
      show: !this.state.show
    })
  }
  render(){
    return <div>
      <h2>React16.x隐藏或显示子组件触发钩子函数</h2>
      <button onClick={this.changeShow}>隐藏/显示</button>
      {this.state.show ? <Child title='我是子组件的标题'></Child> : null}
    </div>
  }
}
子组件验证钩子函数执行顺序
class Child extends React.Component{
  constructor(){
    super()
    this.state = {
      count:0
    }
    console.log('子组件触发------constructor')
  }
  componentWillMount(){
    console.log('触发------componentWillMount')
  }
  componentDidMount(){
    console.log('触发------componentDidMount')
  }

  componentWillReceiveProps(nextProps){
    console.log('更新数据触发------componentWillReceiveProps')
  }
  shouldComponentUpdate(){
    console.log('更新数据触发------shouldComponentUpdate')
    return true
  }
  componentWillUpdate(){
    console.log('更新数据触发------componentWillUpdate')
  }
  componentDidUpdate(){
    console.log('更新数据触发------componentDidUpdate')
  }

  componentWillUnmount(){
    console.log('卸载触发------componentWillUnmount')
  }
  render(){
    console.log('触发------render')
    let { title } = this.props
    return <div className="child">
      <h2>{title}</h2>
    </div>
  }
}
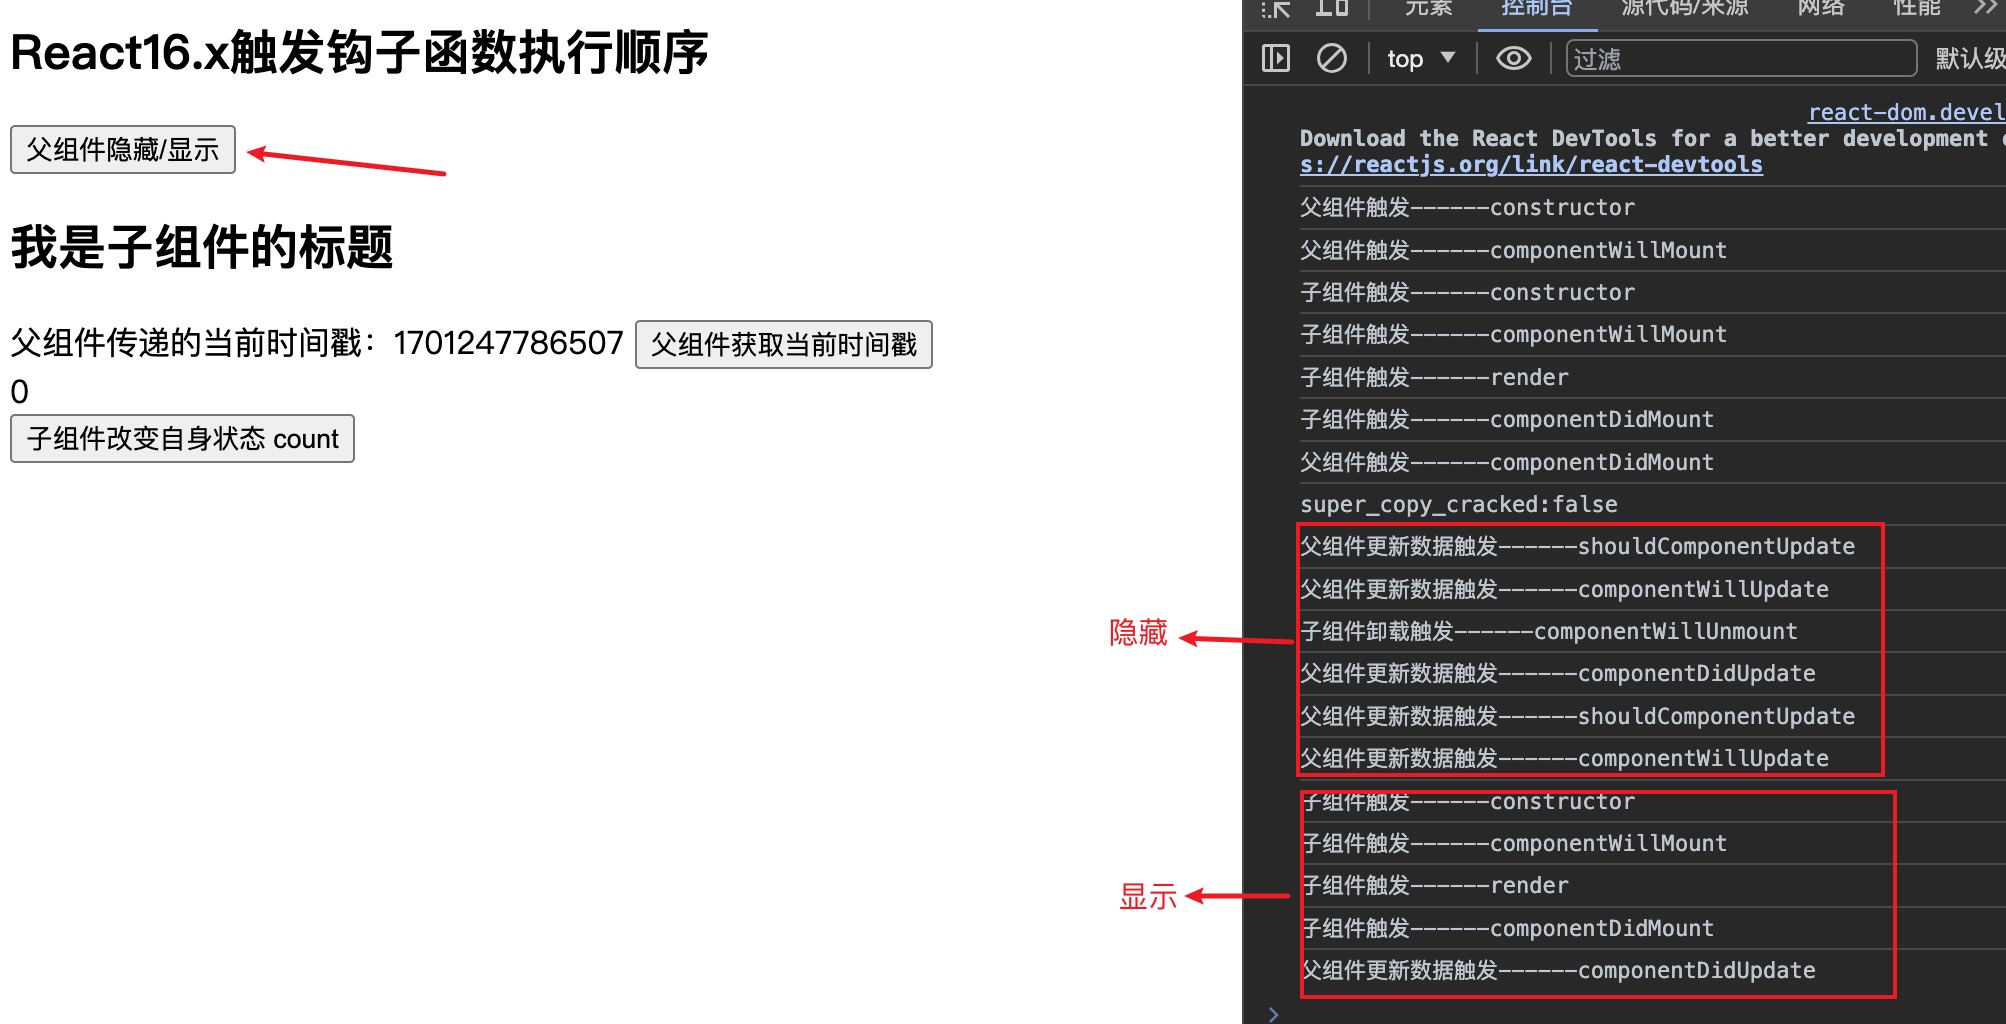
通过点击父组件的按钮来改变state的状态,浏览器输出效果:
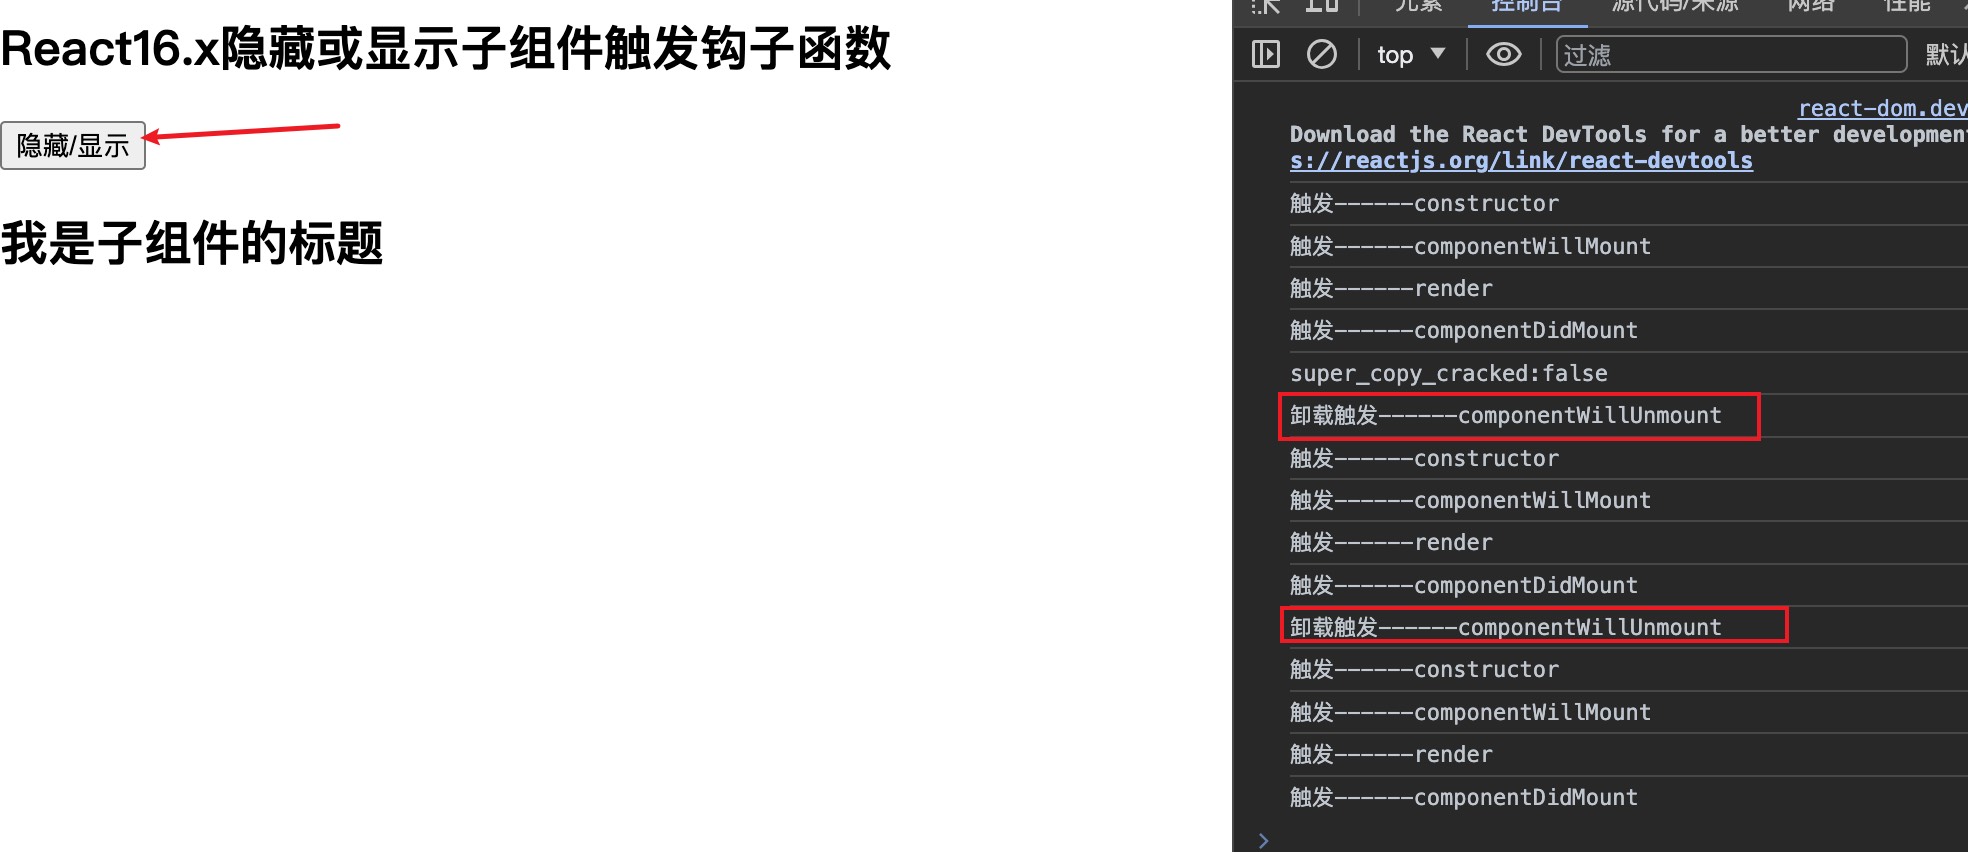
可以在控制台查看,子组件隐藏了(卸载了)只执行了一个钩子函数componentWillUnmount,显示(挂载)执行了constructor、componentWillMount、render、componentDidMount这四个钩子函数。
总结
React16.x版本的生命周期执行顺序
父组件查看钩子函数顺序
class Parent extends React.Component{
  state = {
    show : true,
    time:new Date().getTime()
  }
  constructor(){
    super()
    console.log('父组件触发------constructor')
  }
  componentWillMount(){
    console.log('父组件触发------componentWillMount')
  }
  componentDidMount(){
    console.log('父组件触发------componentDidMount')
  }

  componentWillReceiveProps(nextProps){
    console.log('父组件更新数据触发------componentWillReceiveProps')
  }
  shouldComponentUpdate(){
    console.log('父组件更新数据触发------shouldComponentUpdate')
    return true
  }
  componentWillUpdate(){
    console.log('父组件更新数据触发------componentWillUpdate')
  }
  componentDidUpdate(){
    console.log('父组件更新数据触发------componentDidUpdate')
  }

  componentWillUnmount(){
    console.log('父组件卸载触发------componentWillUnmount')
  }
  changeShow = () => {
    this.setState({
      show: !this.state.show
    })
  }
  getTime = () => {
    this.setState({
      time:new Date().getTime()
    })
  }
  render(){
    return <div>
      <h2>React16.x触发钩子函数执行顺序</h2>
      <button onClick={this.changeShow}>父组件隐藏/显示</button>
      {this.state.show ? <Child title='我是子组件的标题' time={this.state.time}>
        <button onClick={this.getTime}>父组件获取当前时间戳</button>
      </Child> : null}
    </div>
  }
}
子组件查看钩子函数顺序
class Child extends React.Component{
  constructor(){
    super()
    this.state = {
      count:0
    }
    console.log('子组件触发------constructor')
  }
  componentWillMount(){
    console.log('子组件触发------componentWillMount')
  }
  componentDidMount(){
    console.log('子组件触发------componentDidMount')
  }
  componentWillReceiveProps(nextProps){
    console.log('子组件更新数据触发------componentWillReceiveProps')
  }
  shouldComponentUpdate(){
    console.log('子组件更新数据触发------shouldComponentUpdate')
    return true
  }
  componentWillUpdate(){
    console.log('子组件更新数据触发------componentWillUpdate')
  }
  componentDidUpdate(){
    console.log('子组件更新数据触发------componentDidUpdate')
  }

  componentWillUnmount(){
    console.log('子组件卸载触发------componentWillUnmount')
  }
  changeCounter = () => {
    let { count } = this.state;
    this.setState({
      count: ++count,
    });
  }
  render(){
    console.log('子组件触发------render')
    let { title, time, children  } = this.props
    let { count } = this.state
    return <div className="child">
      <h2>{title}</h2>
      <div>父组件传递的当前时间戳:{time} {children}</div>
      <div>{count}</div>
      <button onClick={this.changeCounter}>子组件改变自身状态 count</button>
    </div>
  }
}
父组件和子组件挂载阶段生命周期执行顺序如下:
父组件第一次渲染:
父-constructor -> 父-componentWillMount -> 子-constructor -> 子-componentWillMount -> 子-render -> 子-componentDidMount -> 父-componentDidMount
父组件和子组件更新阶段生命周期执行顺序如下:
父组件更新:
父-shouldComponentUpdate -> 父-componentWillUpdate -> 子-componentWillReceiveProps -> 子-shouldComponentUpdate -> 子-componentWillUpdate -> 子-render -> 子-componentDidUpdate -> 父-componentDidUpdate
父组件和子组件卸载阶段生命周期执行顺序如下:
子组件卸载:
父-shouldComponentUpdate -> 父-componentWillUpdate -> 子-componentWillUnmount -> 父-componentDidUpdate
React18.x版本的生命周期
父组件查看钩子函数顺序
class Parent extends React.Component{
  constructor(){
    super()
    this.state = {
      count:0,
      show:true
    }
    console.log('父组件触发---constructor')
  }
  static  getDerivedStateFromProps(nextProps, prevState){
    console.log('父组件触发---getDerivedStateFromProps',nextProps, prevState)
    return null;
  }
  shouldComponentUpdate(nextProps, nextState){
    console.log('父组件更新触发---shouldComponentUpdate')
    return true
  }
  componentDidMount(){
    console.log('父组件触发---componentDidMount')
  }
  getSnapshotBeforeUpdate(prevProps, prevState){
    console.log('父组件更新触发---getSnapshotBeforeUpdate')
    return null
  }
  componentDidUpdate(prevProps, prevState, snapshot){
    console.log('父组件更新触发---componentDidUpdate')
  }
  componentWillUnmount(){
    console.log('父组件卸载触发------componentWillUnmount')
  }
  changeCount = () => {
    let {count}  = this.state
    this.setState({
      count: ++count
    })
  }
  changeShow = () => {
    this.setState({
      show: !this.state.show
    })
  }
  render(){
    console.log('父组件触发---render')
    let {count}  = this.state
    return <div>
       <h2>React18.x隐藏或显示子组件触发钩子函数</h2>
       <button onClick={this.changeShow}>隐藏/显示子组件</button>
      {this.state.show ? <Child title='子组件标题' count={ count }>
        <button onClick={this.changeCount}>父组件改变:count</button>
      </Child> : null}

    </div>
  }
}
子组件查看钩子函数顺序
class Child extends React.Component{
  constructor(){
    super()
    this.state = {
      count:0,
      num:0
    }
    console.log('子组件触发---constructor')
  }
  static  getDerivedStateFromProps(nextProps, prevState){
    console.log('子组件触发---getDerivedStateFromProps',nextProps, prevState)
    const { count } = nextProps;
    // 当传入的type发生变化的时候,更新state
    if (count !== prevState.type) {
        return {
            count,
        };
    }
    // 否则,对于state不进行任何操作
    return null;
  }
  shouldComponentUpdate(nextProps, nextState){
    console.log('子组件更新触发---shouldComponentUpdate')
    return true
  }
  componentDidMount(){
    console.log('子组件触发---componentDidMount')
  }
  getSnapshotBeforeUpdate(prevProps, prevState){
    console.log('子组件更新触发---getSnapshotBeforeUpdate')
    return null
  }
  componentDidUpdate(prevProps, prevState, snapshot){
    console.log('子组件更新触发---componentDidUpdate')
  }
  componentWillUnmount(){
    console.log('子组件卸载触发------componentWillUnmount')
  }
  changeNum = () => {
    let {num}  = this.state
    this.setState({
      num: ++num
    })
  }
  render(){
    console.log('子组件触发---render')
    let { title, children  } = this.props
    let { count, num  } = this.state
    return <div className="child">
      <h2>{title}</h2>
      {children}
      <div>count:{ count }</div>
      <div>num:{ num }</div>
      <div>
        <button onClick={this.changeNum}>子组件改变自己的状态: num</button>
      </div>
    </div>
  }
}
父组件和子组件挂载阶段生命周期执行顺序如下:
父组件第一次渲染:
父组件触发—constructor -> 父组件触发—getDerivedStateFromProps -> 父组件触发—render -> 子组件触发—constructor -> 子组件触发—getDerivedStateFromProps -> 子组件触发—render -> 子组件触发—componentDidMount -> 父组件触发—componentDidMount
父组件和子组件更新阶段生命周期执行顺序如下:
父组件更新:
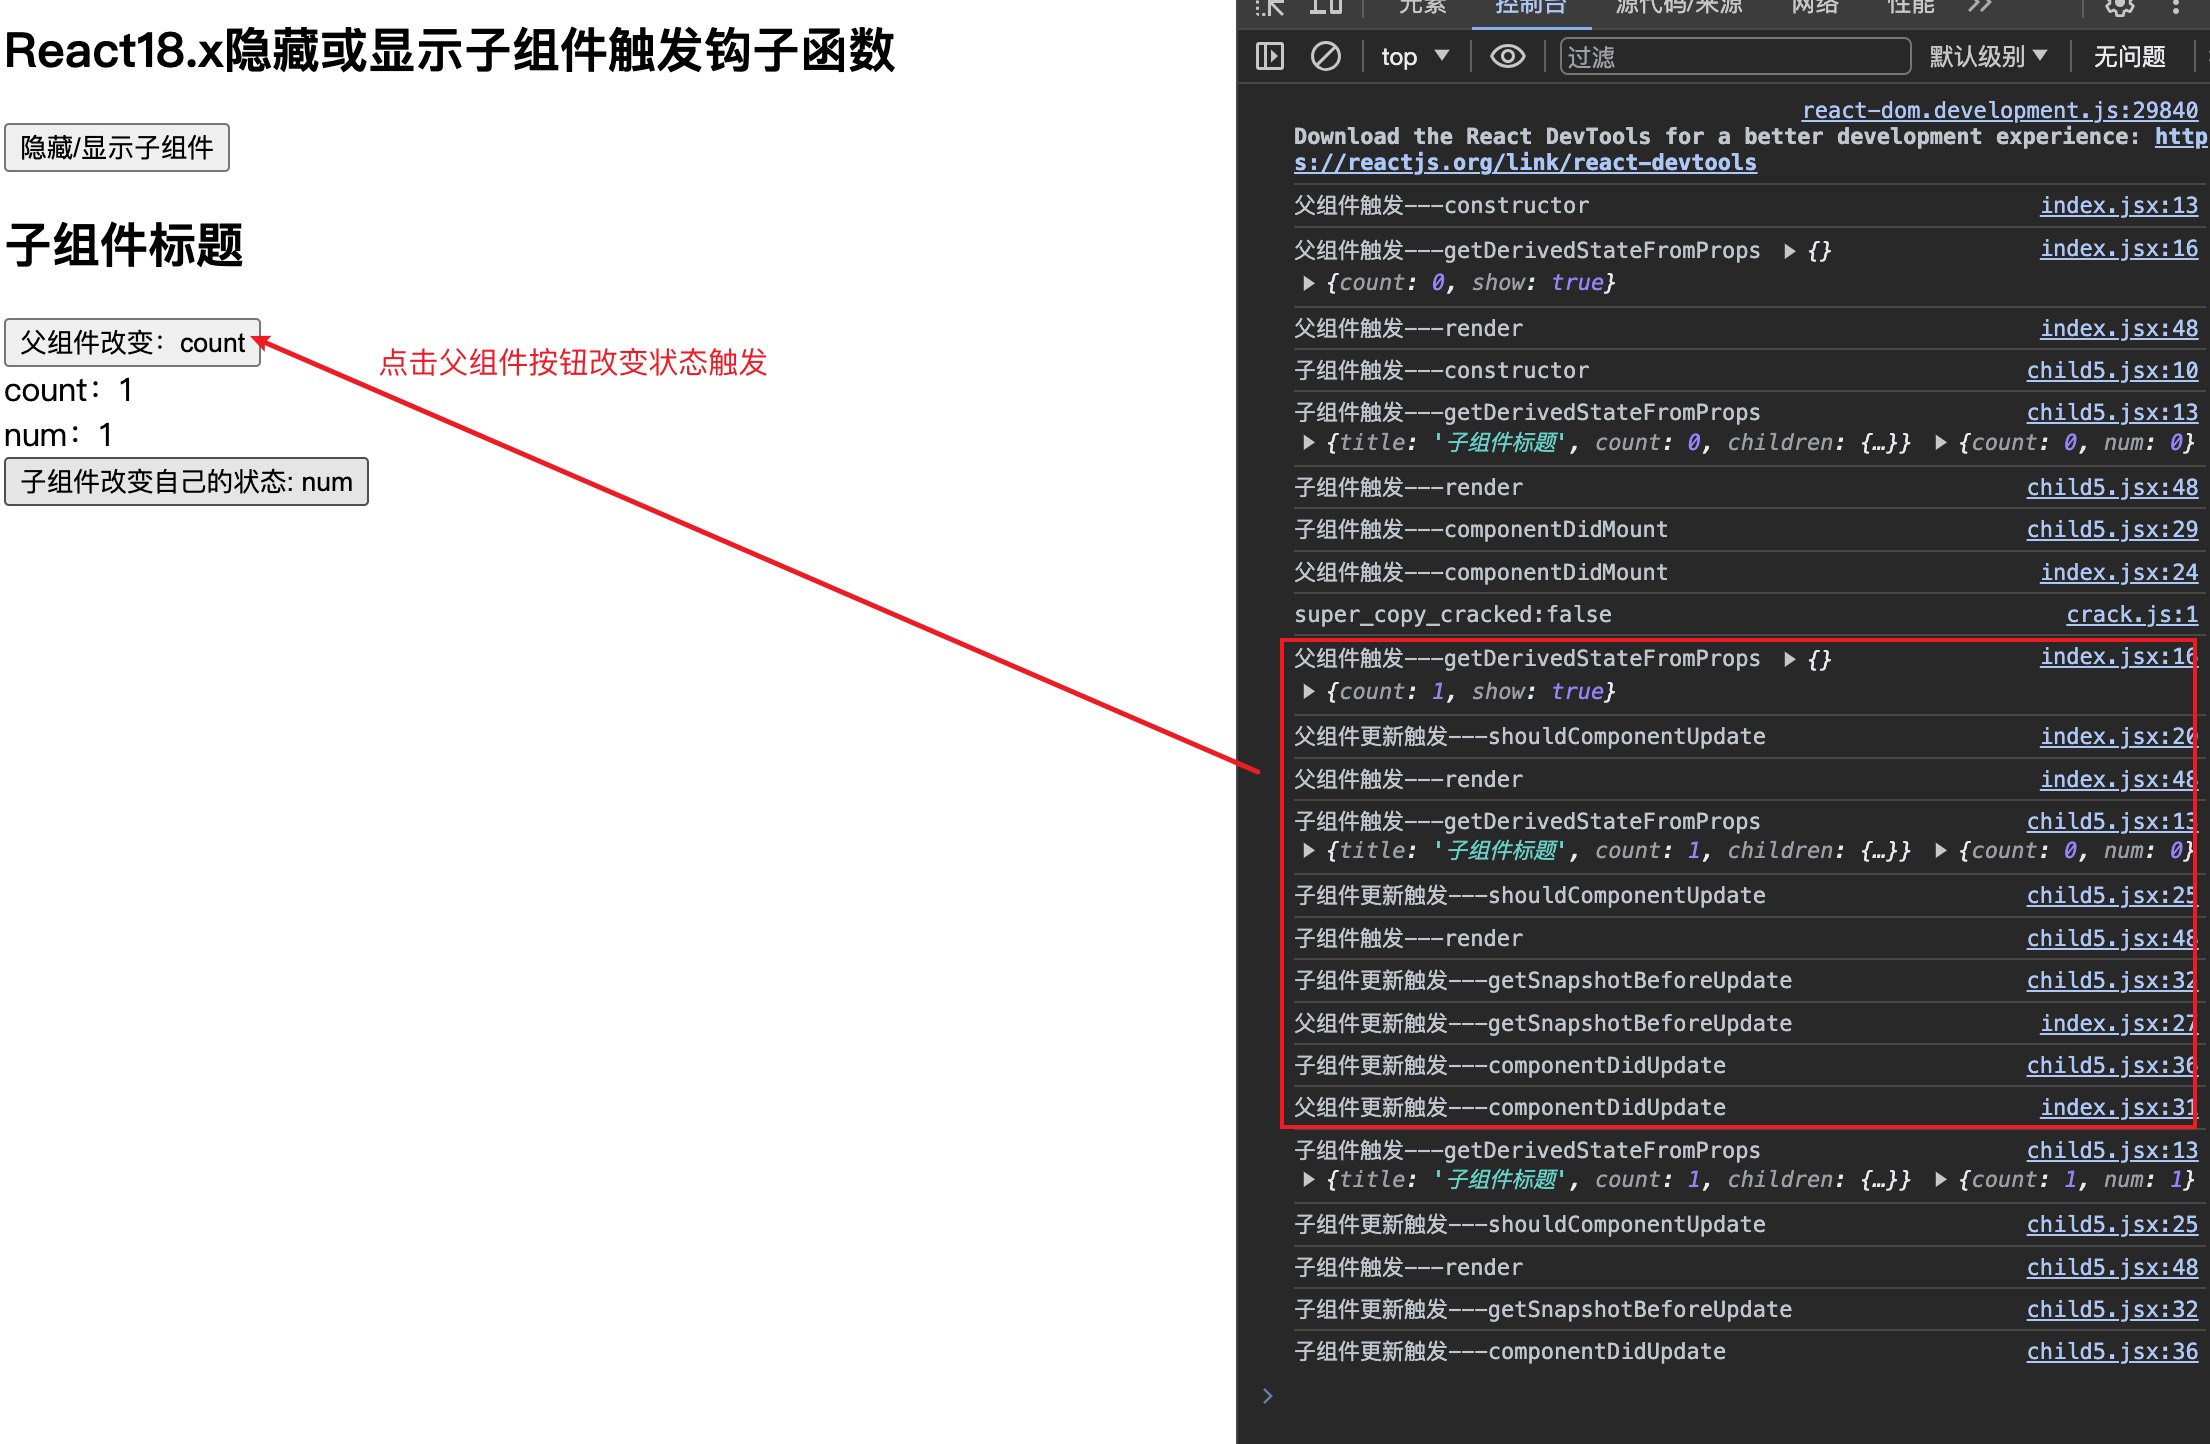
父组件触发—getDerivedStateFromProps -> 父组件更新触发—shouldComponentUpdate -> 父组件触发—render -> 子组件触发—getDerivedStateFromProps -> 子组件更新触发—shouldComponentUpdate -> 子组件触发—render -> 子组件更新触发—getSnapshotBeforeUpdate -> 父组件更新触发—getSnapshotBeforeUpdate -> 子组件更新触发—componentDidUpdate -> 父组件更新触发—componentDidUpdate
父组件和子组件卸载阶段生命周期执行顺序如下:
子组件卸载:
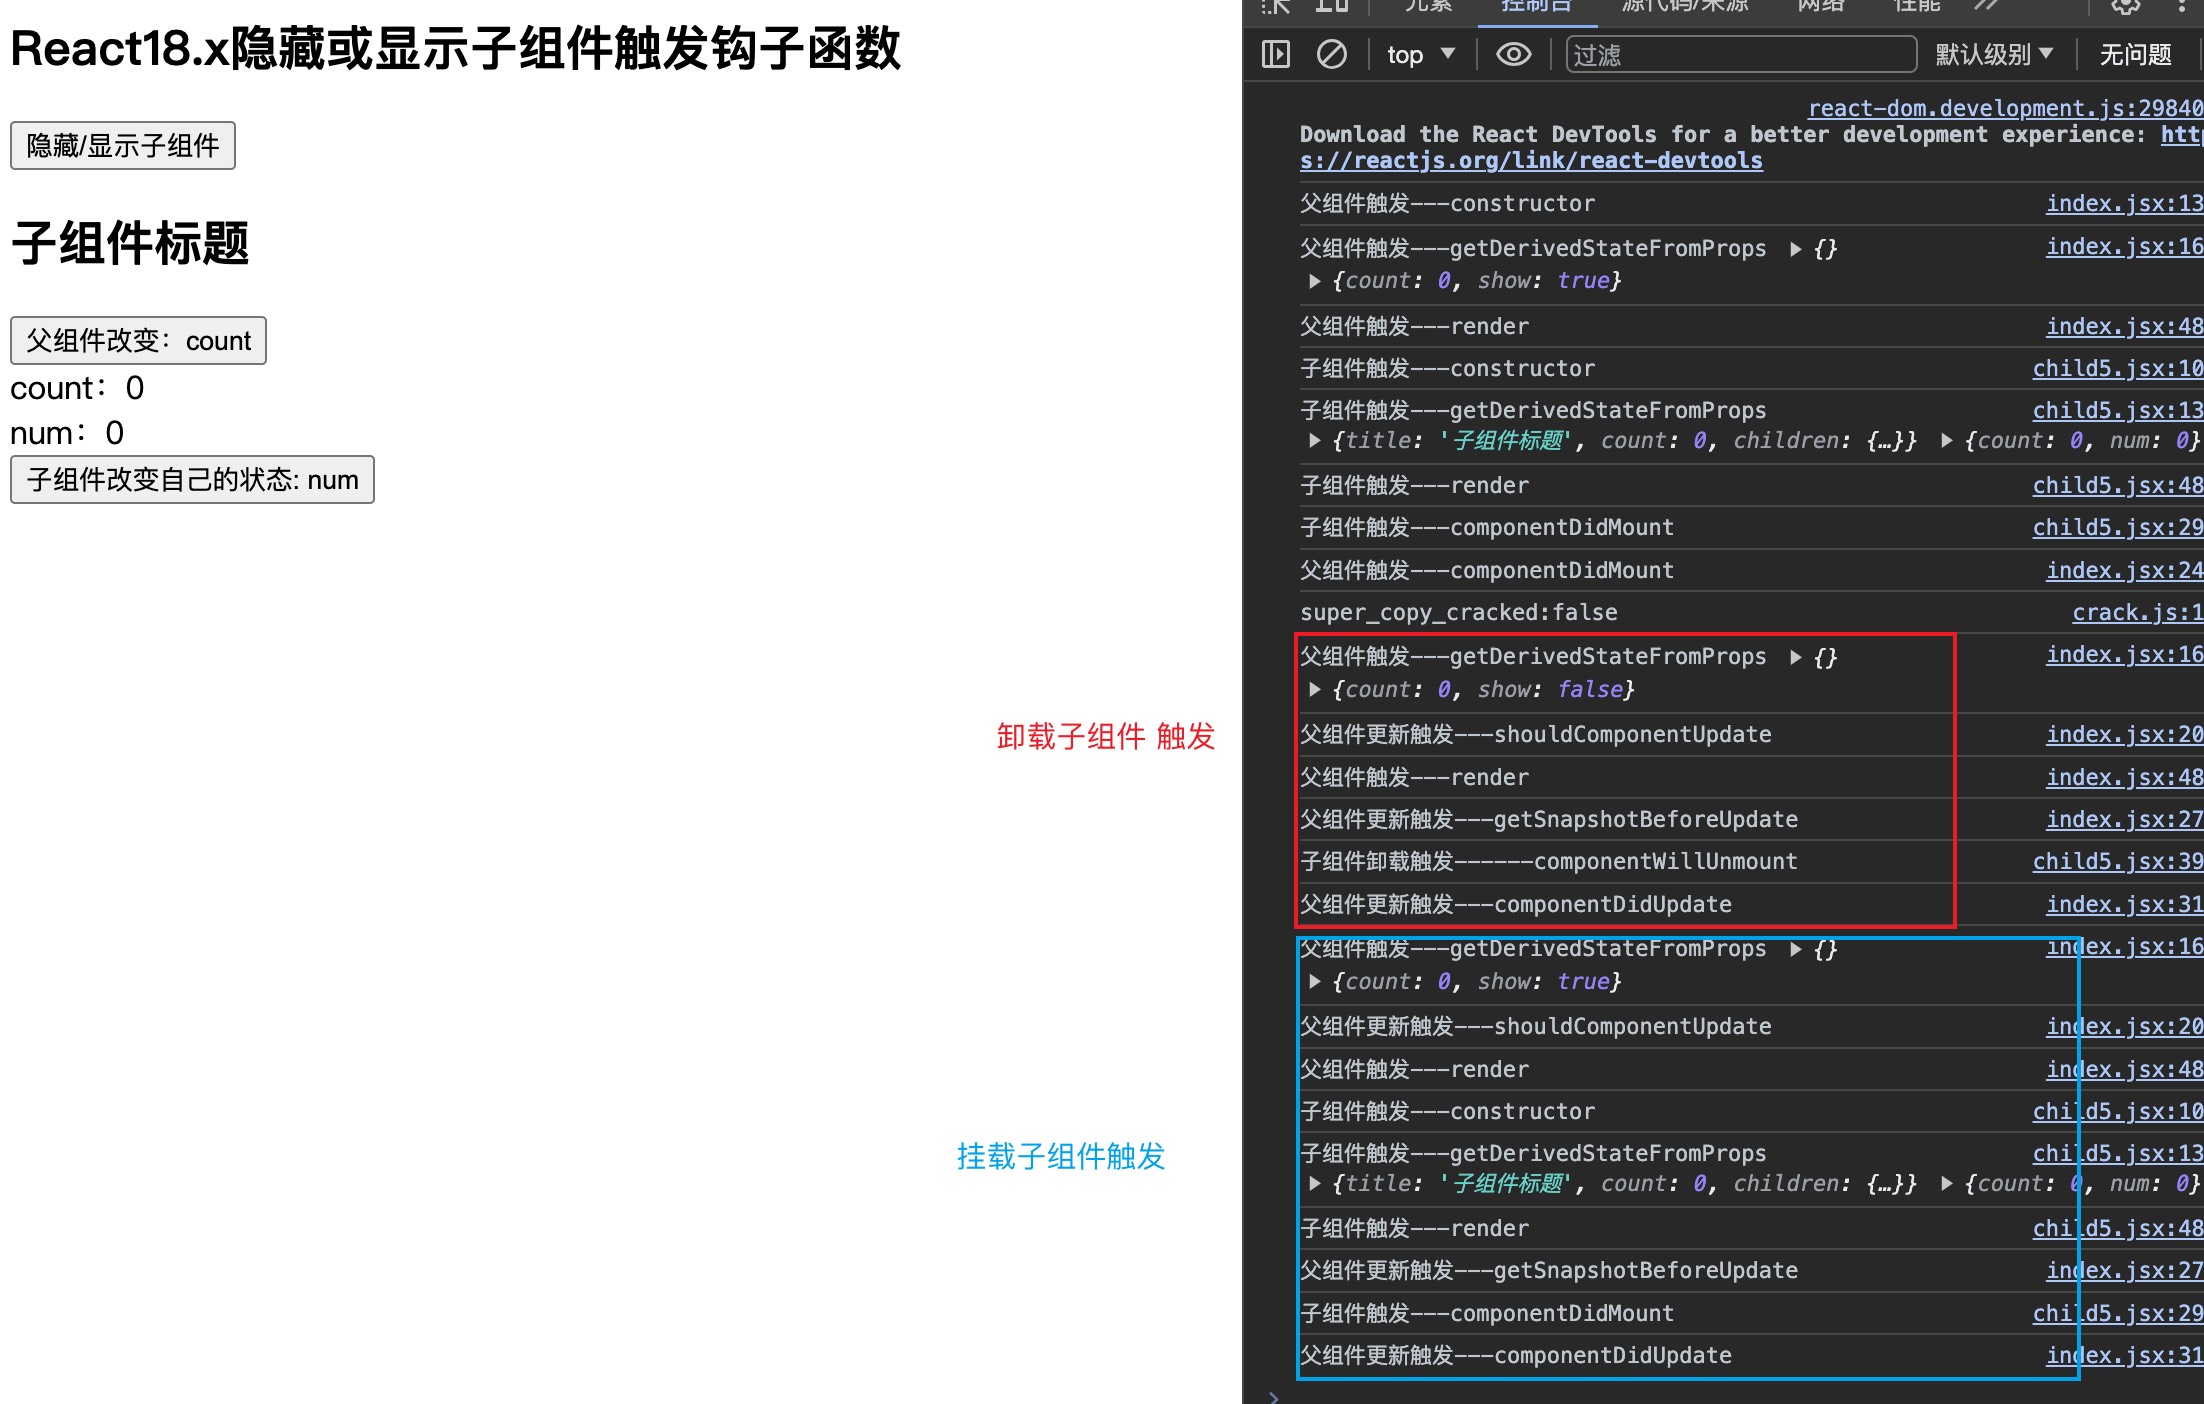
父组件触发—getDerivedStateFromProps -> 父组件更新触发—shouldComponentUpdate -> 父组件触发—render -> 父组件更新触发—getSnapshotBeforeUpdate -> 子组件卸载触发------componentWillUnmount -> 父组件更新触发—componentDidUpdate
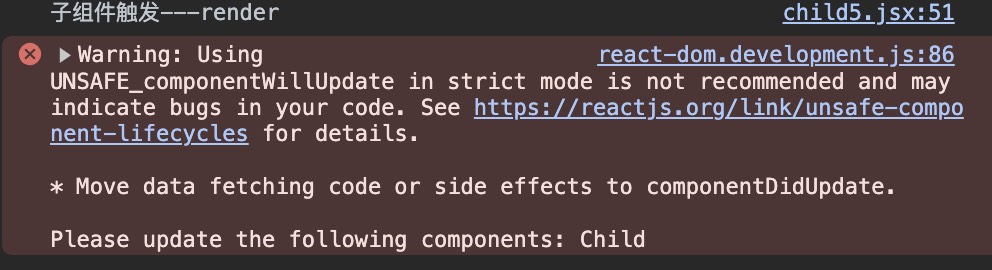
注意:
如果要在React18.x版本中使用componentWillMount、componentWillReceiveProps、componentWillUpdate钩子函数,需要在前面加上UNSAFE_,而且这样写在严格模式React.StrictMode下是不允许的。
使用UNSAFE_在React18.x版本严格模式报错:
以上就是React两个版本的生命周期了,看了这个文章就做到了新旧通吃了。