介绍
Pinia 是一个用于 Vue 的状态管理库,类似 Vuex, 是 Vue 的另一种状态管理方案
Pinia 优势
1.抛弃了Mutations的操作,只有state、getters和actions.极大的简化了状态管理库的使用,让代码编写更加容易直观。
2.不需要嵌套模块,符合Vue3的Composition api ,让代码更加扁平化。
3.更好的支持TypeScript
4.代码更加简洁
安装 Pinia
我是用Vite来创建一个Vue3项目来使用的Pinia
npm install pinia -D
这里安装的版本是"pinia": "^2.0.13",
创建一个Store
在main.ts引入pinia
在/src/main.ts里引入pinia
import { createPinia } from 'pinia'
通过createPinia( )方法,得到pinia的实例和挂载到Vue根实例上
import { createApp } from 'vue'
import App from './App.vue'
import { createPinia } from 'pinia'

// 创建pinia 实例
const pinia = createPinia()
const app =createApp(App)
// 挂载到 Vue 根实例上
app.use(pinia)
app.mount('#app')
创建store状态管理库
在/src目录下,新建一个store文件夹。有了文件夹之后,再创建一个index.ts文件。
import { defineStore} from 'pinia'

export const mainStore = defineStore('main',{
  state:()=>{
    return {}
  },
  getters:{},
  actions:{}
})
defineStore( )方法的第一个参数:相当于为容器起一个名字。这里的名字必须唯一,不能重复。
defineStore( )方法的第二个参数:可以简单理解为一个配置对象,里边是对容器仓库的配置说明。
state 属性:用来存储全局的状态的,这里边定义的,就可以是为SPA里全局的状态了。
getters属性:用来监视或者说是计算状态的变化的,有缓存的功能。
actions属性:对state里数据变化的业务逻辑,修改state全局状态数据的。
在Store里定义一个State,我们这里就写huhaowb!。
state:()=>{
    return {
      huhaowb:'huhaowb'
    }
},
这个huhaowb就是全局的状态数据,是每个页面和组件都可以通过Pinia方法读取到
读取Store数据
在\src\components里,新建一个huhaowb.vue的组件。编写下面的代码
<template>
  <h2 class="">{{ store.huhaowb }}</h2>
</template>

<script lang="ts" setup>
import { mainStore } from "../store/index";
const store = mainStore();
</script>

<style lang="scss" scoped></style>
先引入mainStore,然后通过mainStore得到store实例,就可以在组件里调用store里的state定义的状态数据了。
然后在App.vue里引入。
<script setup lang="ts">
import Huhaowb from './components/Huhaowb.vue'
</script>

<template>
  <img alt="Vue logo" src="./assets/logo.png" />
  <Huhaowb></Huhaowb>
</template>

<style>
#app {
  font-family: Avenir, Helvetica, Arial, sans-serif;
  -webkit-font-smoothing: antialiased;
  -moz-osx-font-smoothing: grayscale;
  text-align: center;
  color: #2c3e50;
  margin-top: 60px;
}
</style>
写好后就可以运行npm run dev查看结果了。
Pinia改变状态数据
先到\store\index.ts的state属性中,增加一个状态数据count : 0
state:()=>{
  return {
    helloWorld:'HelloWorld',
    count:0
  }
}
在\components\文件夹下新建一个文件CountButton.vue。
<template>
  <div><button @click="handleClick">点击增加</button></div>
</template>

<script lang="ts" setup>
import { mainStore } from "../store/index";
const store = mainStore();

const handleClick = () => {
  store.count++;
};
</script>

<style lang="scss" scoped></style>
把count显示在Huhaowb.vue组件里
<template>
  <h2 class="">{{ store.huhaowb }}</h2>
  <h2 class="">{{ store.count }}</h2>
</template>

<script lang="ts" setup>
import { mainStore } from "../store/index";
const store = mainStore();
</script>

<style lang="scss" scoped></style>
然后把CountButton加入到App.vue页面中.
<script setup lang="ts">
import Huhaowb from './components/Huhaowb.vue'
import CountButton from "./components/CountButton.vue";
</script>

<template>
  <img alt="Vue logo" src="./assets/logo.png" />
  <Huhaowb></Huhaowb>
  <CountButton></CountButton>
</template>

<style>
#app {
  font-family: Avenir, Helvetica, Arial, sans-serif;
  -webkit-font-smoothing: antialiased;
  -moz-osx-font-smoothing: grayscale;
  text-align: center;
  color: #2c3e50;
  margin-top: 60px;
}
</style>
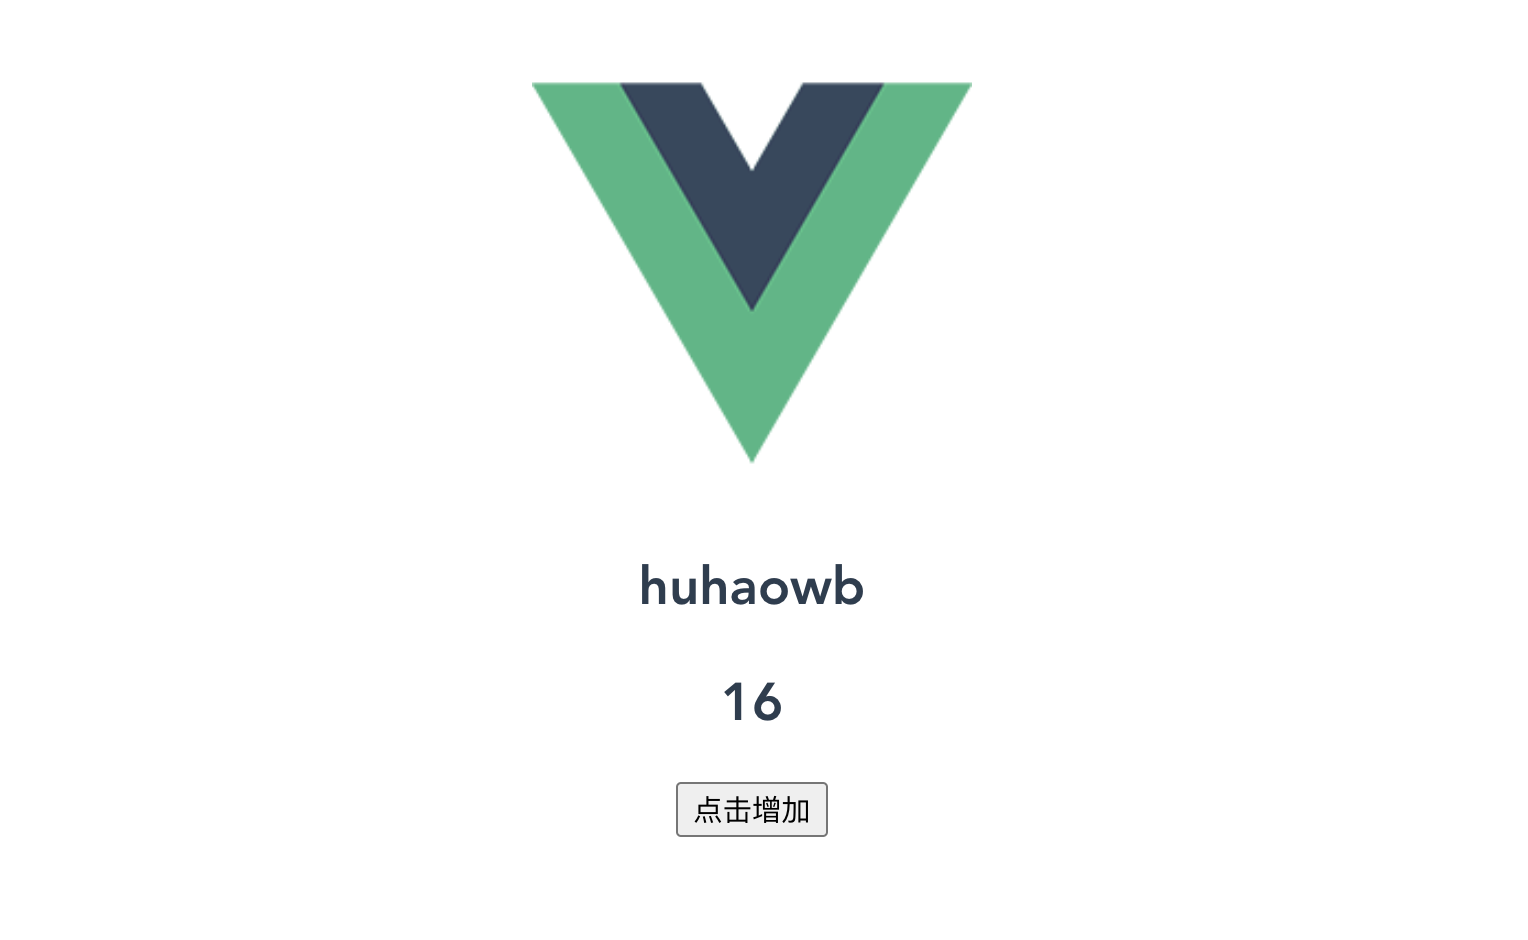
完成以上编写后,就可以到浏览器中查看一下最终的实现效果。点击按钮,两个组件的数据通过Pinia的状态管理,已经可以实现联动了。
注意这里有个坑
我们通常写js都会采用解构方式,使代码更简洁
<template>
  <h2 class="">{{ store.huhaowb }}</h2>
  <h2 class="">{{ store.count }}</h2>
  <hr />
  <h2 class="">{{ huhaowb }}</h2>
  <h2 class="">{{ count }}</h2>
</template>

<script lang="ts" setup>
import { mainStore } from "../store/index";
const store = mainStore();
const { huhaowb, count } = store;
</script>

<style lang="scss" scoped></style>
这样看似简单,但通过解构的数据,只有一次作用,不是响应式数据。也就是说当你改变数据状态时,解构的状态数据不会发生变化。我们这时候再点击增加按钮,可以看到只有没结构的数据发生了变化。
官方提供了storeToRefs( )方法解决这个问题
引入storeToRefs( )
import { storeToRefs } from "pinia";
const { helloWorld, count } = storeToRefs(store);
这样数据拥有了响应式能力。
Pinia修改状态数据的多种方式
$patch
$patch对象修改数据
<template>
  <div><button @click="handleClickPatch">修改数据($patch)</button></div>
</template>

<script lang="ts" setup>
import { mainStore } from "../store/index";
const store = mainStore();

const handleClickPatch = () => {
  store.$patch({
    count: store.count + 2,
    huhaowb: store.huhaowb ===  'huhaowb'?  '改变后' + store.huhaowb : 'huhaowb'
  });
};
</script>

<style lang="scss" scoped></style>
$patch的方式是经过优化的,会加快修改速度,对程序的性能有很大的好处。推荐使用$patch方式更新。
$patch函数修改数据
<template>
  <div><button @click="handleClickMethod">修改数据($patch+函数)</button></div>
</template>

<script lang="ts" setup>
import { mainStore } from "../store/index";
const store = mainStore();

const handleClickMethod = () => {
  store.$patch((state) => {
    state.count++;
    state.huhaowb = state.huhaowb === "huhaowb" ? '改变后' + store.huhaowb : "huhaowb";
  });
};
</script>

<style lang="scss" scoped></style>
actions
actions修改数据
如果有比较复杂的逻辑,我们可以通过在store里,定义好actions中的函数,然后在组件里再调用函数。
\src\store\index.ts文件里编写changeState( )方法,用来改变数据状态。
import { defineStore} from 'pinia'
export const mainStore = defineStore('main',{
  state:()=>{
    return {
        huhaowb:'huhaowb',
        count:0
    }
  },
  getters:{},
  actions:{
    changeState(){
        this.count++
        this.huhaowb='改变后的'+ this.huhaowb
    }
  }
})
在用actions的时候,不能使用箭头函数,因为箭头函数绑定是外部的this。
错误写法
actions:{
    changeState:()=>{
        this.count++
        this.huhaowb='改变后的'+ this.huhaowb
    }
  }
CountButton.vue文件调用action的方法changeState( )
<template>
  <div><button @click="handleClickActions">修改数据(actions)</button></div>
</template>

<script lang="ts" setup>
import { mainStore } from "../store/index";
const store = mainStore();

const handleClickActions = ()=>{
  store.changeState()
}
</script>

<style lang="scss" scoped></style>
Getters
Pinia 中的 Getters 作用与 Vuex 中的 Getters 相同,Getter 完全等同于 Store 状态的计算值。
Pinia 中的 Getters 直接在 Store 上读取,形似 Store.xx
Getter 第一个参数是 state,是当前的状态,也可以使用 this.xx 获取状态
Getter 中也可以访问其他的 Getter, 或者是其他的 Store
import { defineStore} from 'pinia'

export const mainStore = defineStore('main',{
  state:()=>{
    return {
        huhaowb:'huhaowb',
        count:2
    }
  },
  getters:{
    // 一个基本的 Getter: 计算 count 的平方
    // 使用参数
    countPow2(state) {
        return state.count ** 2;
    },
    // 使用 this
    countPow2this() : Number{
        return this.count ** 2;
    },
    // 简单的 Getter 直接使用箭头函数
    countPow3: state=> state.count ** 2,
    // 获取其它 Getter, 直接通过 this
    countPow2Getter() {
        return this.countPow2;
    }
  },
  actions:{
    changeState(){
        this.count++
        this.huhaowb='改变后的'+ this.huhaowb
    }
  }
})
新建一个Store仓库otherState.ts
import { defineStore } from "pinia";

export const useStore = defineStore('otherState',{
  state: ()=> ({
    count: 5
  }),
});
在index.ts这个仓库中调用了。
import { defineStore} from 'pinia'
import { useStore } from "./otherState.js";

export const mainStore = defineStore('main',{
  state:()=>{
    return {
        huhaowb:'huhaowb',
        count:2
    }
  },
  getters:{
    //...
    // 使用其它 Store
    otherStoreCount(state) {
        // 这里是其他的 Store,调用获取 Store,就和在 setup 中一样
        const otherStore = useStore();
        return state.count + otherStore.count;
    },
  },
  actions:{
    changeState(){
        this.count++
        this.huhaowb='改变后的'+ this.huhaowb
    }
  }
})
通过actions修改其他Store里面的State
import { defineStore} from 'pinia'
import { useStore } from "./otherState.js";

export const mainStore = defineStore('main',{
  state:()=>{
    return {
        huhaowb:'huhaowb',
        count:2
    }
  },
  getters:{
    //...
    // 获取修改后的 Store
    getotherStoreCount(state) {
        // 这里是其他的 Store,调用获取 Store,就和在 setup 中一样
        const otherStore = useStore();
        return otherStore.count;
    },
  },
  actions:{
    //...
    getOtherState(){
        const otherStore = useStore();
        otherStore.count  =  otherStore.count  * 2
    }
  }
})
CountButton.vue添加handleClickActionsOther()方法
<template>
  <div><button @click="handleClickActionsOther">修改其他Store数据Count(actions)</button></div>
</template>

<script lang="ts" setup>
//....
const handleClickActionsOther = ()=>{
  store.getOtherState()
}
</script>

<style lang="scss" scoped></style>
Huhaowb.vue使用
<template>
  <h2 class="">{{ store.huhaowb }}</h2>
  <h2 class="">{{ store.count }}</h2>
  <hr />
  <h2 class="">{{ huhaowb }}</h2>
  <h2 class="">{{ count }}</h2>
  <hr />
  <h2 class="">{{ countPow2 }}</h2>
  <h2 class="">{{ otherStoreCount }}</h2>
  <hr />
  <h2 class="">{{ getotherStoreCount }}</h2>

</template>

<script lang="ts" setup>
import { storeToRefs } from "pinia";
import { mainStore } from "../store/index";
const store = mainStore();
const { huhaowb, count, countPow2, otherStoreCount ,getotherStoreCount} = storeToRefs(store);
</script>

<style lang="scss" scoped></style>
以上就是Pinia状态管理的基本使用了,希望对你有帮助。